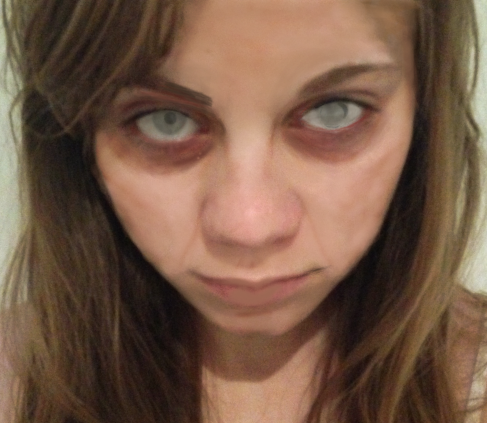
The first thing I did was enhance the detail on the face and I did this by using the burn tool. The burn tool darkens detail on the photograph which is why I used it on areas such as underneath the eyes and and underneath the cheek bones to contour the face creating a tired and underweight facial look to relate to the zombie being ill and hungry.
 I used a soft brush and carefully did a few strokes over the areas to gain the look i wanted. When I was happy with the features that I enhances I airbrushed the face to make the darker areas blend with the rest of the skin. To do this I used a soft brush and used the alt button and right clicked on a section of the skin, which i then brushed around the face creating a softened and blended effect.
After this, I used the brush tool again to add some colour to the face to exaggerate the ill and infected look. I used a soft brush and a medium blue colour changing the opacity to 25% to avoid the colour looking too harsh. I then added this colour around the eyes and the mouth to create some bruising. I also used this colour to create stroked down the face representing veins and i did this because it will look like the blood is draining from the body exaggerating the zombie look.
I also added elements of red, blue and green around the eyes to make them look tired and infected. I added purple veins on the lips to make them look dry and cracked just what people would expect from a zombie.

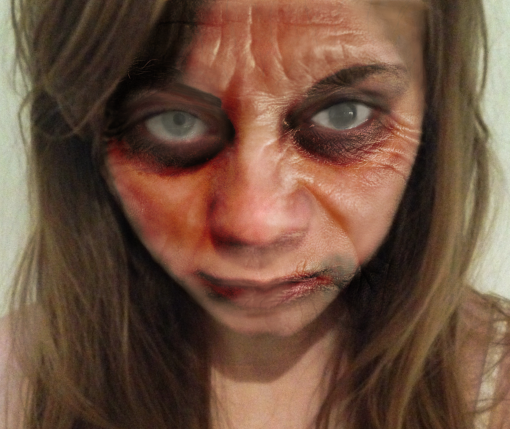
After this I got an image of an old man and used the texture of her face for the skin of my zombie. To do this I opened the image of the old woman into Photoshop and used the lasso tool to cut out her face. I then copied the image and pasted it onto mine. I then changed the effect of the image to overlay, which made the two image blend together. I then aligned the two faced together and changed the exposure and contrast until my desired look.
Now that I had the texture of the skin I went back to adding more cuts to the mouth by using the red paintbrush tool and more blue and green tones around the eyes and mouth to represent bruising.
By adding colour around the mouth it makes the viewer think the zombie has currently eaten something or someone which means they can use their imagination to create their own story behind the image. I airbrushed the lips by using the alt key and selecting the original lip colour that i then painted across the whole lips to make them look pale.
In order to create the splatter effects I downloaded blood splatter brush tools into Photoshop and they were very useful when making the final touches to my piece by making it that extra bit more gory and bloody.
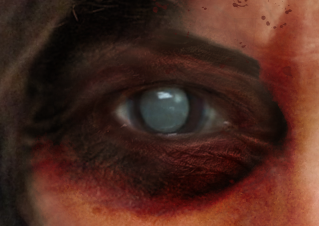
After this I started working on the eyes. I did the same technique again by using an image of an eye infection and using this to blend in with the original eye. I used the overlay effect to make it blend and it gave me a result I was happy with.
 I went over the waterline of the eye with a paintbrush tool in a red colour to make the eyes look sore as well as using the burn tool to make the white part of the eye look dull so it didn't look fresh and alive.
While using the brush tool i added more red, blue and green around the eyes to exaggerate the gore and to make the skin colour of the eyelids and underneath the eyes look equal.
You can see here that they eye has a more evil and dark look to it and the texture is also visible. I used a dark black and dark red as a curved line underneath the eye to make the eye look sunken in and gory.
I decided to go back and add more dull colours to the face by contouring simply to make it look like the zombie has been infected for a while and wondering around outdoors for a while so the dirt on the face will show that.
To finalise my piece I added burns to the skin to make it look a bit more damaged

To do this I searched burns on google and various images came up of people with burns on their skin so i cut out the burn from the image using the lasso tool and pasted this on my image. I then used the overlay effect and altered the contrast so that it blended well with the skin to avoid it looking like it has been placed there.
For the burn on the forehead i decided to add more bruising and redness around it by using blood platter tools to make it look recent and gory.

I added blood to the nose by using one of the blood splatter tools i downloaded however It looked fake so i went in with the burn tool to darken closer to the nostril and added more red to the drip of blood.
After all this I ended up with my final piece. It turned out better than I expected and the gory and infected look I wanted was achieved which I am happy with.
This final piece is what is going to be used on the magazine page and the bus poster advertisement , which I will begin next week.


No comments:
Post a Comment